-
플러터 어플개발 연습 #1주차 숙제 : 화면구성(Movie Reviews 만들기)Programing/Flutter 2023. 4. 22. 22:03반응형
의지박약으로 인해 혼자서는 공부도, 연습도 제대로 안하게 되길래 돈을 썼습니다.
스파르타코딩클럽에서 내일배움카드로 플러터 강의 수강이 가능하길래 결제했습니다.
(당연히 광고 아닙니다. 광고 받을 수 있는 조회수가 나오면 좋겠다...)
매주의 수강내용을 조금씩 정리하거나, 숙제 진행과정을 포스트 해보려고 합니다.
1주차 숙제는 Movie Reviews 화면을 만드는 것입니다.
매우 간단해 보이지만 프론트를 한번도 만들어본 적이 없는 저로서는 일단 막막합니다.
그래서 일단 쉬운 appbar부터 만들어봤습니다.
1. AppBar
import 'package:flutter/material.dart'; void main() { runApp(const MyApp()); } class MyApp extends StatelessWidget { const MyApp({Key? key}) : super(key: key); @override Widget build(BuildContext context) { return MaterialApp( debugShowCheckedModeBanner: false, home: Scaffold( appBar: AppBar( backgroundColor: Colors.white, foregroundColor: Colors.black, elevation: 0, title: Row( mainAxisAlignment: MainAxisAlignment.spaceBetween, children: [ const Text("Movie Reviews"), IconButton( onPressed: () {}, icon: const Icon( Icons.perm_identity, ), // Icon ), //IconButton ], ), // Row ), //AppBar body: const HomePage()), // 홈페이지 보여주기 ); // MaterialApp } }- home에 Scaffold widget을 넣었습니다.
- 일단 먼저 title 안에 Text 위젯으로 제목을 지정했습니다.
- 오른쪽에 icon을 넣어야하니, Text위젯을 Row로 감쌌습니다.
- Text위젯 다음에 IconButton위젯을 넣었습니다. 아이콘 검색은 여기서 검색했습니다.
- Text와 Icon을 서로 떨어뜨려야 하니, Row에 mainAxisAlignment를 설정했습니다.
- AppBar의 back/foregroundColor를 설정했습니다. 그림자를 없애기 위해 elevation:0으로 설정했습니다.

1. AppBar 오버레이 현황 2. 검색용 텍스트박스
class HomePage extends StatelessWidget { const HomePage({Key? key}) : super(key: key); @override Widget build(BuildContext context) { // 음식 사진 데이터 List<Map<String, dynamic>> dataList = [ { "category": "탑건: 매버릭", "imgUrl": "https://i.ibb.co/sR32PN3/topgun.jpg", }, // 생략 ]; // 화면에 보이는 영역 return const Padding( padding: EdgeInsets.all(8.0), child: TextField( decoration: InputDecoration( border: OutlineInputBorder(), hintText: "영화 제목을 검색해주세요.", suffixIcon: Icon(Icons.search), ), // InputDecoration ), // TextField ); // Padding } }- return에 TextField 위젯을 넣었습니다.
- TextField 위젯에 decoration을 넣었습니다.
- TextField를 Padding으로 감쌌습니다.

2. TextField 오버레이 현황 3. ListView.Builder
return Column( children: [ const Padding( padding: EdgeInsets.all(8.0), child: TextField( decoration: InputDecoration( border: OutlineInputBorder(), hintText: "영화 제목을 검색해주세요.", suffixIcon: Icon(Icons.search), ), // InputDecoration ), // TextField ), // Padding Expanded( child: ListView.builder( itemCount: min(10, dataList.length), itemBuilder: (context, index) { String category = dataList[index]['category']; String imgUrl = dataList[index]['imgUrl']; return Card( child: Image.network( imgUrl, height: 250, width: double.infinity, fit: BoxFit.fitWidth, ), // Image.network ); // Card }, ), // ListView.builder ) // Expanded ], ); // Column- ListView 위젯을 만들어줬습니다.
- itemBuilder 위젯이 Card 위젯을 return하도록 했습니다.
- Card 위젯 안에 Image.network를 넣어줍니다.
- 이미지의 크기를 맞춰줍니다.
- 마지막으로 ListView를 Expanded로 감싸줍니다 (스크롤 가능하도록)

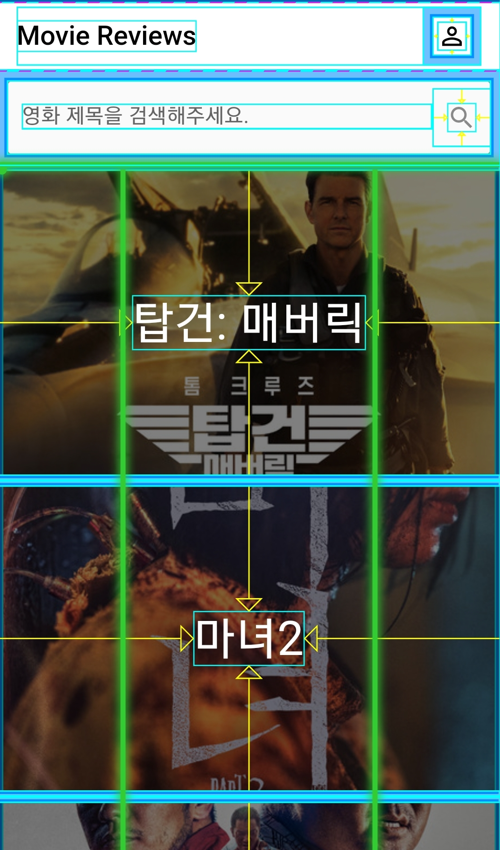
3. ListView 오버레이 현황 4. Stack
사진 위에 글씨를 올리기 위해서 Stack위젯을 사용합니다.
Expanded( child: ListView.builder( itemCount: min(10, dataList.length), itemBuilder: (context, index) { String category = dataList[index]['category']; String imgUrl = dataList[index]['imgUrl']; return Stack( alignment: Alignment.center, children: [ Card( child: Image.network( imgUrl, height: 250, width: double.infinity, fit: BoxFit.fitWidth, ), // Image.network ), // Card Container( alignment: Alignment.center, color: Colors.black.withOpacity(0.5), height: 250, width: double.infinity, child: Text( category, style: const TextStyle( color: Colors.white, fontSize: 35, ), // TextStyle ), // Text ) // Container ], ); // Stack }, ), // ListView.builder- Card 위젯을 Stack으로 감쌌습니다.
- Childeren에서 Card 위젯 다음에 Text 위젯을 만들었습니다.
- 글씨 스타일을 지정한 후, Text 위젯을 Containter 위젯으로 감쌌습니다. (배경색 지정을 위함)
- Containter 위젯의 크기를 설정해줍니다.
- Stack위젯과 Containter위젯의 Alignment를 지정해줬습니다.

4. Stack 오버레이 현황 장장 3시간에 걸쳐 만들었습니다ㄷㄷㄷ
다 만들고보니,
많은 사람들은 Scaffold 자체를 클래스로 만들던데
저는 Scaffold를 MyApp 안에 넣고, body를 클래스로 만들었었네요...??ㅋㅋㅋㅋㅋ
반응형'Programing > Flutter' 카테고리의 다른 글