-
[Flutter] A problem occurred configuring project > Namespace not specified. (오래된 패키지 namespace 오류 해결)Programing/Flutter 2024. 10. 19. 21:16반응형
새 프로젝트를 시작하고
auto_start_flutter를 추가하려는데 아래와 같이 에러가 발생했습니다.

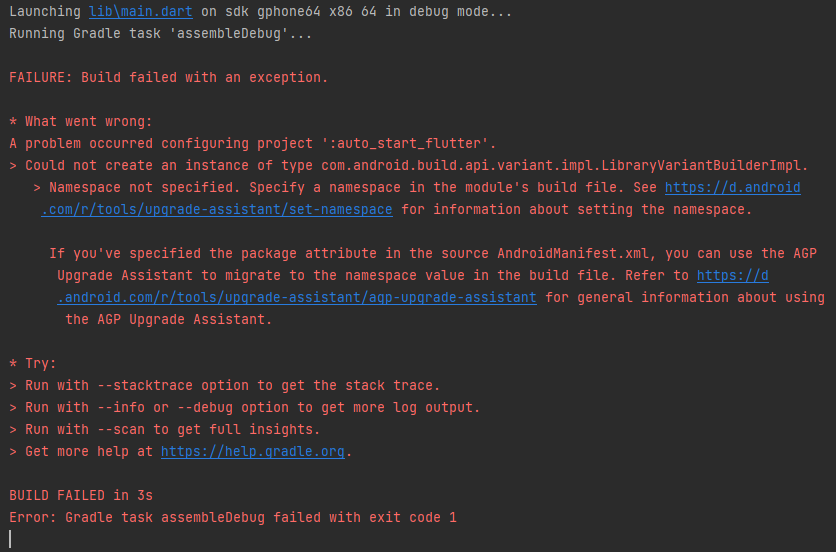
auto_start_flutter의 Namespace를 못찾는다고 합니다. 더보기FAILURE: Build failed with an exception.
* What went wrong:
A problem occurred configuring project ':auto_start_flutter'.
> Could not create an instance of type cohttp://m.android.build.api.variant.impl.LibraryVariantBuilderImpl.
> Namespace not specified. Specify a namespace in the module's build file. See https://d.android.com/r/tools/upgrade-assistant/set-namespace for information about setting the namespace.
If you've specified the package attribute in the source AndroidManifest.xml, you can use the AGP Upgrade Assistant to migrate to the namespace value in the build file. Refer to https://d.android.com/r/tools/upgrade-assistant/agp-upgrade-assistant for general information about using the AGP Upgrade Assistant.
* Try:
> Run with --stacktrace option to get the stack trace.
> Run with --info or --debug option to get more log output.
> Run with --scan to get full insights.
> Get more help at https://help.gradle.org.
BUILD FAILED in 3s
Error: Gradle task assembleDebug failed with exit code 1알려주는 링크를 들어가봐도 잘 모르겠고...
왜 다른 패키지들은 잘 되는데 뭐가 뭔지 모르겠습니다.
예상원인
안드로이드 버전이 바뀌면서 각 패키지의 namespace 지정 위치가 바뀌었다고 합니다.
참조링크1, 참조링크2(참조링크1에 있는 자료영상링크)
AndroidManifest.xml → build.gradle
그 와중, auto_start_flutter 는 가장 최신 업데이트가 2년 전이였으니 정보를 못찾았기 때문인 것 같습니다.
해결
0) 주의사항
이 해결방법은 프로젝트 외부의 패키지 파일을 수정하는 방법으로,
타 프로젝트에서도 해당 패키지를 사용하고 있다면 주의해야 합니다.
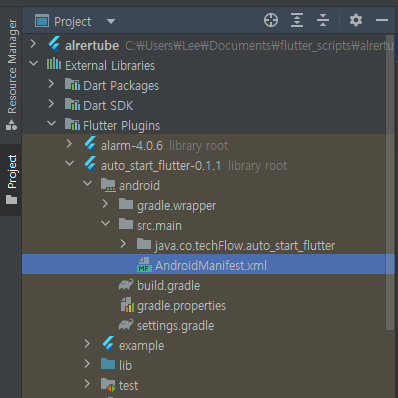
1) AndroidManifest.xml에서 기존 namespace 확인
위치: C:\Users\{사용자명}\AppData\Local\Pub\Cache\hosted\pub.dev\{패키지명}\android\src.main.AndroidManifest.xml

여기 이 위치의 AndroidManifes.xml 
저게 namespace 역할을 합니다. 확인 후 주석처리 하거나 삭제하셔야 합니다.
그대로 남겨두면 또다른 에러가 발생합니다.
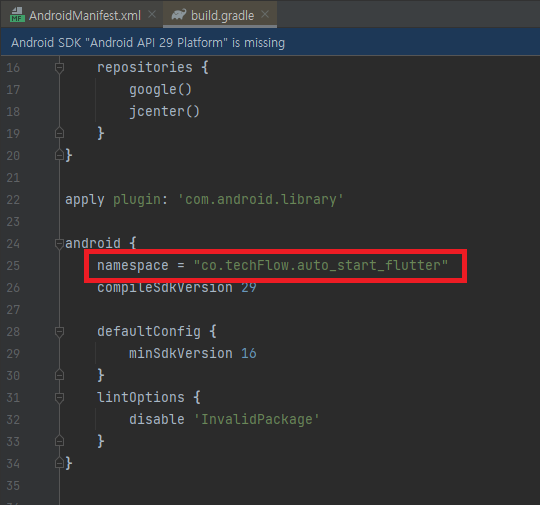
2) build.gradle에 namespace 추가
위치: C:\Users\{사용자명}\AppData\Local\Pub\Cache\hosted\pub.dev\{패키지명}\android\build.gradle

여기 이 위치의 build.gradle 
android { } 안에 추가 android { namespace = "기존namespace" }
이제 잘 돌아갑니다.
반응형'Programing > Flutter' 카테고리의 다른 글